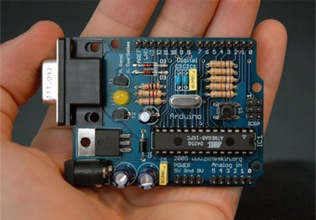
Arduino - Photo by Nicholas Zambetti
Last year I had the opportunity to help out a friend with a project for a class he took at MassArt. We used a microcontroller with buttons for a UI, and fed the data into the serial port of a computer. We used Max/MSP to generate MIDI data and finally used Ableton Live to trigger audio sample playback from the MIDI.
The system was overly complex, but the coding was actually a minimal amount of work. It got me thinking about a few μController-based projects that have been on the back burner for a few years. I figured it would be good to conduct a quick survey of the chips that are being commonly used and have the best online support networks.
The Arduino is actually what we used for the Max-Ableton project I mentioned above. This is a family of creative commons controlled boards, with open source software to build on. My experience working with the Arduino was very enjoyable - the combination of a high-level language and lots of support online made the job easy. You can get a great board for as little $30, and you’re pretty much ready to go out of the gate. The boards are based around ATmega RISC micros.
There’s also a great series of articles on producing sound from an Arduino here.
Phidgets are a system of chips and sensors linked to a computer via USB. These boards are designed to operate in tandem with the computer, instead of as standalone processors. There’s an API for pulling together interfacing applications on the computer side, and there’s a Max/MSP object for interfacing directly with the Phidgets. The sensors available include buttons, encoders, accelerometers, PH sensors, and thermocouples, ranging in price from $28-95.
Handyboard is an MIT design, with a focus primarily on robotics. These boards are setup for reading sensors and driving motors. There are only a few vendors, and the boards run in the $100 range. There’s a fair amount of information on the MIT site, but the online community using the Arduino platform seems to be a lot larger.
The PIC platform has been around for years, and is a simple solution for the serious DIYer. This solution is a little messier than some of the others listed above, because you’re dealing a lot more at the component level and coding in assembly language. You’ll need a PIC programmer, and then you’re pretty much ready to go.
The biggest benefit I can see from PICs are the low cost of the chips. With the Arduinos you’re likely buying $30 boards; you can can PIC chips for anywhere from $1-8. The economy of scale is very nice here, but for building a one-off circuit I’d likely stick to the pricier options above.
I added this to the list because of the audio capabilities, but this is less a microcontroller system than it is a tiny Linux computer. The cost is greater than the systems listed above, and the documentation is still under development. I tried a project on this about a year ago, and ran into a number of issues. I attribute them to my limited experience with Linux, something I’d like to rectify.
This list is far from complete - it’s just a few of the platforms I know people are working from. As I gear up for a new project, I’ll continue to look into suitable μController platforms and post about them here.

