My classmate Csky was profiled in Northeastern Magazine - it’s a good, short read about Bernie Gordon’s latest donation to the Gordon Engineering Leadership program.

File Transporter Port Mapping
TL;DR
To find an open port available to access my File Transporter from work:
- Use the Firebind Scan Applet to find an open UDP port.
- Following the steps in this support article to assign your File Transporter to the open port.
Background
I’ve owned a File Transporter for almost a year now, but I’ve never been able to access it from my office. It’s been a source of endless frustration, because I store my entire paperless filing system on it and I need access to those documents fairly regularly.
It was a source of endless frustration, until today.
It’s not that I don’t need to access the documents any more; I finally fixed my access problem from the office. First, I should make clear that I work at a large company, so I don’t have any control over our IT policies. Our IT team is well intentioned, but this is not a problem that they would have had any interest in solving.
Initial Attempts
I started with this support article, which details the steps needed to assign your File Transporter to a port other than the default of UDP 8083. The article suggests using a high port number that won’t be in use by any other services, unless you’re in a secure network. In that case, you may want to use a common port number since those are more likely to be open. Since UDP 8083 wasn’t working for me, I tried their next suggestion of UDP 443 (see this list for the common uses of each port).
That still wasn’t working for me.
I learned a bit about using nmap to test the port statuses, to figure out why things weren’t working. Interestingly, I found that, in my home network, both ports 8083 and 443 were ‘Closed’. At work 443 was ‘Closed’ and 8083 was ‘Filtered’. At the time, I didn’t realize was that I wasn’t providing the -u flag to tell nmap to scan the UDP port instead of the TCP port.
The Solution
At bit of searching turned up the Firebind Scan Applet. I let it run in the background for a couple of hours to find a UDP port that my office network left open. It returned a few options (fewer than 1% of the ports were open), so I picked one. Using the same procedure as before, I changed the Transporter settings to use the new port. Voilà; success.
In hindsight, that seems like a trivial solution, but I was stumped for a long time. I thought I should document the steps I took to resolve the issue.
File Transporter Support
As a side note, the support team at Connected Data (the makers of File Transporter) is great. Unfortunately, I can’t say the same thing about their help desk system. I know Drobo purchased Connected Data, and it seems like they’ve tried merging their support systems. When I log in from the File Transporter support site, I don’t see all of their support responses. If I log in via the Drobo site, I can see the complete chain. The responses that I do see often begin:
Hello $contacts.name.first $contacts.name.last,
And when I try responding by email, my responses almost always get bounced back to me. Anyway, this problem is resolved, so I probably shouldn’t complain too much.
Daniel Mintseris on Ableton Live
For the last few weeks I’ve been spending a lot of time in Ableton Live, prepping for the show I played last night with Sleep Studies. I’m still using the skeleton of the Live set I first built for our first show, almost four years ago. I’ve learned a lot about the tool since then, but I’ve only made minimal changes to the way I run the show.

When I got home last night, I found this in my twitter feed:
Daniel Mintseris controls sound changes w/ #ClipAutomation in @st_vincent's live show http://t.co/JbbPtAKUWl learn more in his @lynda course
— Ableton (@Ableton) August 29, 2014I was curious to see if there was anything useful in the Lynda course that I could apply to our set. Was there ever. Daniel Mintseris had a ton of useful suggestions to make things run smoothly. I think Lynda offers a free trial, so I definitely suggest setting up an account and watching this for yourself if you’re interested in using Live with a band. Here’s a high-level overview of what I learned:
- Avoid the built-in click track function of Live1. Instead, use a MIDI clip driving a Simpler instance with the click of your choice. This gives you a lot more control over the sound and other parameters.
- Daniel suggests a nested hierarchy of Instrument Racks to facilitate switching sounds between songs, through Chain groups. He suggests a master Instrument Rack per controller, with nested racks per song, and further nesting for sections of songs and key ranges in each section.
- He suggests using a rack macro to select the desired chain, but additionally, mapping that macro to disable the chains you don’t need to save on processing power. Then, dummy MIDI clips in that track can be used switch the rack macro automatically at the beginning of each song.
- Providing a scene with a name ending in “Xbpm” will automatically set the tempo for the scene to X. How did I not know this?2
- Disable auto-warping of long samples, and check the results of warping, since Ableton makes incorrect guesses sometimes. I’ve seen the mistakes, but I didn’t realize I could disable auto-warping.
- You can use the External Audio Effects plug-in to break select sounds in a Drum Rack out to separate physical output channels. Very useful if you have enough output channels. We’ve been doing our whole set with just two channels, because of the limitations of most clubs we play.
- Make a separate session that drives all output channels for a line check. Do this for both audio and MIDI output channels, and loop the session, so you don’t have to be present for the line check.
- Some of the MIDI gear used by St. Vincent includes the Roland TMC-6 Trigger to MIDI converter, the Roland RT trigger series, and RJM Masterminds for guitar effects.
This course was well worth the two hours I gave it. Check it out. And then come see our next show on October 19, and I’ll gladly share all of the changes I made to the way we do things.
-
I came to the same conclusion on my own, but I hadn’t yet implemented it. Instead, I actually have a MIDI track that toggles the state of the built-in click track at the start and stop of each song. Of course, if the set starts with the click in the wrong state, it does exactly the opposite of what I intended. ↩
-
This is actually what’s kept me managing our set in Arrangement View instead of Session View… I’m feeling pretty stupid about this now. ↩
Stupid Bugs in Word
I just wrapped up my thesis-equivalent project1, and over the course of it I learned a lot more about Microsoft Word than I ever knew before. It weighed in at about 90 pages, also making it the longest thing I’ve ever written.
Anyway, the very last thing I needed to do before submitting it was to update the index fields (my table of contents, table of figures, and table of tables). Since I used cross-references throughout the paper, I figured this would be straightforward. Control-click, select Update Fields…, and voilà:
")
Um… what happened to Figures 10, 12, 17, 19, 21, 32, and a few others? I did everything I could think of to restore them without any luck. I should say here that this was in Microsoft Word 2011 (the Mac version), so my gut was telling me that I should see what would happen if I used Word 2013 (for Windows):
")
…and, they’re back, confirming my opinion that Word is a piece of shit application. I saved the document with that change, and pulled it back over to the Mac. As long as I only let the table update the page numbers of the figures, things stayed ok.
#wunderberger

Netflix + Charter
I saw this tweet1 come up in my feed the other day:
Tried this Netflix video test: http://t.co/4ZMdWdkOBI
@VerizonFiOS: 375 kbps
@VerizonFiOS + VPN to work: 3000 kbps
Work is 4.6 miles away.
— John Siracusa (@siracusa) July 23, 2014Which reminded me of this blog post from a week ago. Since we have the joy of paying Charter Communications for our internet access2, I figured I’d check to see how solid our connection was.
First, I ran the test over our home Wi-Fi network:

Then I did the same test, but VPNed into work (about 20 miles away):

So, Charter seems to be doing right by us here. If only we could get them to stop mailing us offers for TV service, I might actually be a satisfied customer.
-
This also gave me a chance to play around with Dr. Drang’s modified blackbirdpy.py script, but then I stumbled onto his post about Twitter’s “new” (to me) embedding capability. ↩
-
Like so many Americans, we only have one option for non-DSL high-speed internet access. ↩
Eno • Hyde’s *High Life* at 24-bits
Based on the glowing Pitchfork review of the new Eno • Hyde album High Life, and being a lifelong Brian Eno fan, I downloaded the album from Bleep. I chose Bleep because I try to only buy lossless music1, and they offered both 16- and 24-bit versions of the audio.
I was really curious to see what the difference between the 16- and 24-bit versions was; my hope was that the sessions were handled at 24-bit and in mastering they just dithered down to 16-bit to produce the CD master. I figured I could just load up two versions of the same song in MATLAB and take the difference.
This gist shows what I did, which was straightforward:
- Load both versions of “Return”
- Take the difference
- Normalize to 0.99 FS
- Plot the first 5000 samples
- Save out a wav file
This is the plot generated by that code:
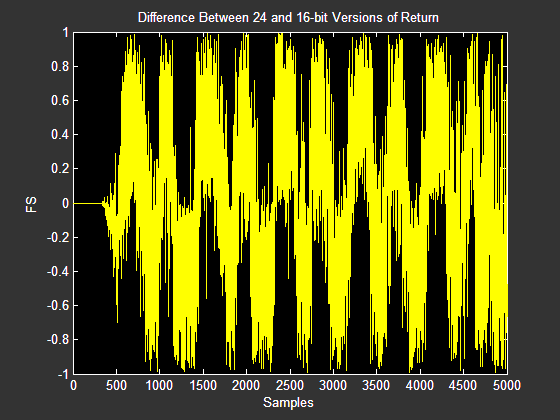
To me, that looks like a really noisy audio file. This makes sense. My guess would be that the 24-bit version represents 23-bits of audio plus 1-bit of dither, and the 16-bit version is the same with 9-bits of dither, truncated down to 16-bits. Taking the difference then would give us the original audio contained in those last 8-bits, but there will be noise of approximately equal energy.
Here’s what it sounds like:
Conclusion: There’s real value in purchasing the 24-bit audio, assuming you have a decent system2 for playing it back.
AT&T iPhones in Portugal
I just returned from a trip to Portugal with my wife; she was lucky enough to spend two weeks as a TA at the Disquiet literary conference, so we tagged a week of vacation on to the end of the trip. Since we’re lost without our phones, there was no question as to whether we would bring them. The challenge was to minimize the cost to us.
This guide presents my planning for our trip, and probably will only be useful for other American AT&T iPhone users. This information was accurate as of July 2014. It’s long, but hopefully thorough enough to be useful.
TL;DR
- Unlock your phone if AT&T will let you
- Setup call forwarding to your voicemail
- Incoming SMS is free, and avoid sending.
- Buy a data-only SIM card for your unlocked phone, or pay AT&T for the cheapest international data plan you can get away with.
Services
I think it’s helpful to consider three main parts of your phone service, and what you’ll need while traveling.
Phone service
We decided we didn’t really need access to standard phone service while we were traveling. We were both fine just having our calls dump to voicemail and leaving them alone until we were home. Everyone important knew we would be out of the country and weren’t expecting to be able to reach us by phone.
Our plan was to use FaceTime and Skype to make data-only voice or video calls. This requires a little more advance scheduling, but seemed workable.
As a side note, I tried using the Google Voice app for this purpose a few years ago while we were in Dublin. I used it once and quickly realized it was dialing using the standard phone mechanism, so I aborted and deleted the app. I haven’t tried this again recently; maybe it would be an acceptable alternative at this point?
SMS
With the abundance of free messaging services, and the high costs of international SMS, this wasn’t a priority for us either. My wife uses WhatsApp with one friend, and beyond that we use iMessage with all of our friends and family. Those services work on data only, so we don’t need SMS access abroad.
Data
Data access is the whole reason we cared about using our phones abroad. We expected to find Wi-Fi almost everywhere, but we were planning to be driving and navigating a lot, and, turns out, I don’t really remember how to do that without a phone. My wife would be trying to get around Lisbon a lot on her own, and just having a map isn’t useful to her - she needs to see her dot moving around to know if she’s headed the right way down the street. Data access is critical for this1.
Service Options
Put the phones in Airplane Mode and only use Wi-Fi
I think it’s still something of a secret that you can use Wi-Fi while in Airplane Mode. You can turn Wi-Fi and Bluetooth back on by just tapping the buttons in Control Center.
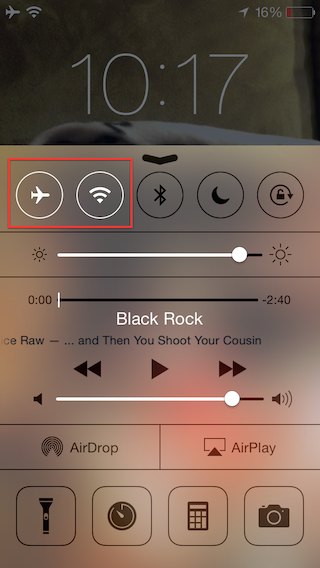
This would address our needs except for data access. FaceTime, Skype, iMessage and WhatsApp would all still be fine while we’re in Wi-Fi, so we would still be able to communicate.
Since the GPS is tied to the cell radio, any pictures you take in Airplane Mode will probably be missing geotagging metadata. I haven’t tested this, but it seems likely to be the case.
Use services from AT&T
With AT&T, international phone calls are expensive. Since that’s not a service we were interested in, that’s fine - we can skip phone calls. There is a problem with this, though. Even if you never place a call, or answer an incoming call, if your phone rings and you let the call go to voicemail you will be billed at an international rate for the time used to leave a message. The best solution I found for this is to activate call forwarding before you leave the US, to prevent calls from ever hitting your phone. If you only have a cell phone, what number should you forward to? How about your voicemail? These instructions guide you to call *#67# on your GSM phone to find the direct dial number for your voicemail.
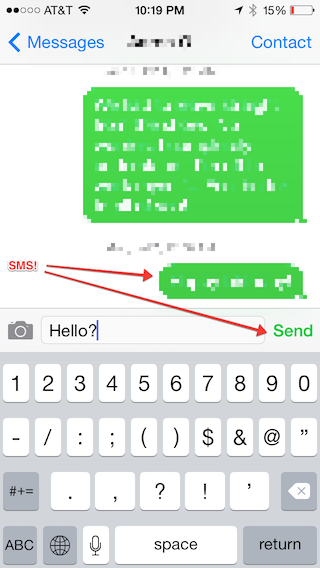
According to AT&T, the family SMS plan we have includes free receipt of text messages while we’re abroad, so there’s no concern here with leaving the service enabled. Sending texts is still expensive, but we can just opt not to send any. Since most of our friends use iMessage, we could just deactivate the setting for iMessage to fall back to SMS, to avoid accidentally sending any SMS messages.

The only thing to still be careful about is not responding to those green messages, since those are contacts without the iMessage service.
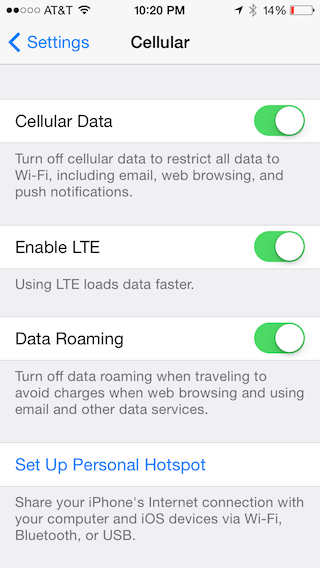
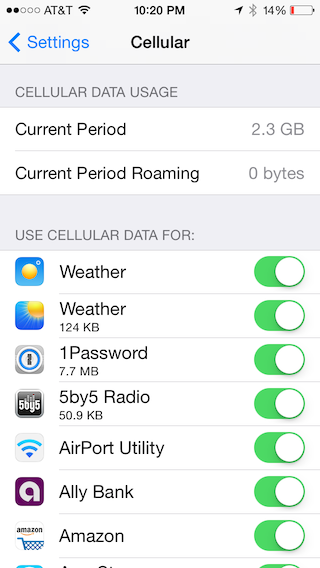
AT&T will happily sell you overpriced international data. As of July 2014, it costs about $30 for 120 MB of data, and $60 for 300 MB. All that you need to do to access this is enable international data roaming (after adding the service to your account). You can also use the Cellular panel to monitor your data use and disable certain apps that you don’t want consuming your precious, overpriced data.
Unlocked phone
If you’ve had an AT&T phone long enough to pay off the cost2, AT&T will allow you to unlock the phone. I think it may be the case with Verizon that the SIM slot is unlocked from day one, but I don’t have a device to try it with.
You can request an unlock from AT&T. Once you’ve received an email confirmation of your unlock, you’ll need to do a backup and restore of your phone from iTunes. I recommend an encrypted backup, because that will restore your passwords in addition to your data, simplifying the process a bit. After a successful restore, you should see a message saying something like “Congratulations, your iPhone is unlocked”.
I did two restores without seeing the “Congratulations, your iPhone is unlocked” message in iTunes. I ended up calling AT&T and receiving a second confirmation email. On the third restore, I backed up, and then used the “Erase all Content and Settings” function on my phone, and then restored the backup. I finally saw the success message. Note that a backup and restore can take a long time - two or more hours, in my case - so plan ahead!
Once you have an unlocked phone, you can purchase a SIM card at your destination and pay much more reasonable fees for data. In Portugal, Vodafone offers GO Plus. For €15 you get 1 GB of data, good for 30 days, with a SIM card.
For phone calls, you’ll have a different number. All calls to your old number should just dump to voicemail, which is exactly what we wanted. If you don’t give out the new number, there are no issues with incoming calls.
The same is true with text messaging. Since you’re using a different number, you won’t see messages sent to your old number. I’m not sure if SMS messages sent to the old number are retained for later delivery, but iMessage should work just fine.
The Plan
My wife has a one year old iPhone 5S that AT&T would not unlock. She also has an old iPhone 4 with a failing home button which I have unlocked. We considered sending her with both phones so that she could use her 5S in Wi-Fi, with call forwarding on and international data roaming disabled. That would keep her from incurring any additional costs from AT&T. She could then buy a SIM card for the old iPhone 4, and have data access there for navigation, email, and messaging as needed while away from Wi-Fi.
The cost difference between 1GB of data on the unlocked phone (at €15 from Vodafone) and 120 MB of data through AT&T (at $30) was small enough, and she was convinced that she could live in 120 MB for two weeks (she usually uses less than 300 MB a month). We decided to just pony up for the AT&T data, so she would only have to manage one phone on the trip.
I have an almost two-year old iPhone 5 which AT&T told me I could unlock. Since I’m adventurous, I planned to buy the Vodaphone SIM card at the airport and avoid paying AT&T anything. That would be our primary navigation device, and I could broadcast a personal hotspot to my wife if she needed data beyond her 120 MB cap.
How it worked out
My wife ended up burning through her 120 MB of data pretty quickly. By that point we were committed - since she didn’t bring the old phone with her, and she still needed data for navigation in Lisbon, we bumped her up to the 300 MB for $60 plan. Since we made that change mid-month, my hope is that we can cancel it at the end of the cycle and pay a pro-rated amount. She kept her total data use under 190 MB, which was what my back-of-the-envelope math3 indicated the pro-rated data cap should work out to.
I bought the Vodaphone GO Plus package for €15. Using it was pretty straight forward; the gentleman at the store in the Lisbon airport popped it in and showed me where the 4-digit pin was on the package. I was off and running.
I did run into a couple unexpected behaviors, though. At one point I rebooted the phone and I was presented with a Locked SIM prompt, requesting the 4-digit pin again. Fortunately I still had it, but this is something to be careful about (and keep track of). Messages also kept prompting me for a phone number “to be able to use iMessage”. I entered the new phone number associated with the SIM and it stopped yelling at me, but I also stopped receiving messages to my original phone number. Hopefully this resolves itself easily once I put the original SIM back in.
Our total expected cost is $42 plus €15. If AT&T doesn’t surprise us with any unexpected charges, I would definitely do the same routine next time. Access to easy communication with our families back home and the simplicity of data for navigation made that cost more than worthwhile to us.
Some Advice
If you’re looking at upgrading your iPhone, consider keeping an older unlocked iPhone around if you’re planning any international travel.
Be sure to consider the three main parts of your phone bill (phone, SMS, data), and make sure you have a solution that will keep you from being surprised on all three fronts. Call AT&T and discuss your plans if you’re unsure. But also keep in mind that the customer service reps at AT&T probably know less about this than you do, now, so be sure to double check anything they tell you. A quick search usually turns up a recent ton of information on this subject.