Category Archives: General

Computing Panning Curves

The guys at Goodhertz put together a good post with quite a bit of detail about the various types of panning available. We had a brief exchange on twitter about level-based panning:

I had read about the SSL -4.5dB pan curve a while back. Supposedly this came about because in good1 rooms, the rooms in which SSL consoles were installed, the audio from both channels tended to be more correlated at the listening position than in other rooms. If the audio arriving at your ears is perfectly correlated, it should sum in amplitude, and you would actually want the center position of the pan to be -6dB from the edges of the curve. -3dB only makes sense if the arriving sound is perfectly uncorrelated, or random.

In reality, you probably want something that was frequency dependent. Since low frequencies tend to arrive at your ears in a correlated fashion, while the high frequency content probably arrives fairly randomly, you would want a gradual transition from -6dB to -3dB. My guess is that the SSL boards choose -4.5dB as a compromise.

But how do you generate these curves? The -3dB curve is fairly straightforward. If you normalize your pan values to cover the range 0-1 (where 0 is all the way left, and 1 is all the way right), you can just use:

\[ \begin{align} {gain}_{left} & = \left( \cos { \frac{\pi}{2} \color{red}{pan}} \right) \\ {gain}_{right} & = \left( \sin { \frac{\pi}{2} \color{red}{pan}} \right) \end{align} \]

To get to -6dB, you actually need to square the curves for -3dB:

\[ \begin{align} {gain}_{left} & = \left( \cos { \frac{\pi}{2} \color{red}{pan}} \right)^{2} \\ {gain}_{right} & = \left( \sin { \frac{\pi}{2} \color{red}{pan}} \right)^{2} \end{align} \]

So how do you generalize this? You can use:

\[ \begin{align} {gain}_{left} & = \left( \cos { \frac{\pi}{2} \color{red}{pan}} \right)^{\frac{\color{red}{dB}}{3.01}} \\ {gain}_{right} & = \left( \sin { \frac{\pi}{2} \color{red}{pan}} \right)^{\frac{\color{red}{dB}}{3.01}} \end{align} \]

Where dB is any amount of attenuation at detent (for instance, the SSL -4.5dB value). This figure shows the resulting tapers (normalized for a pan of 0.5):
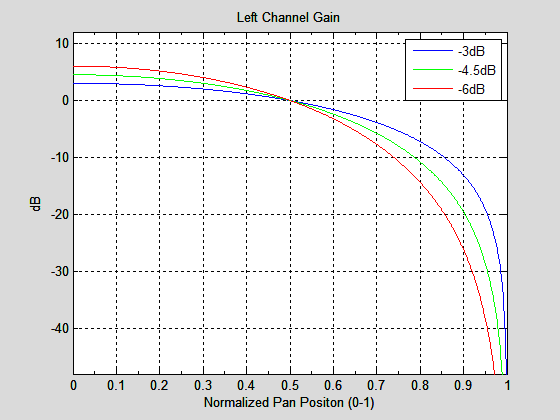
Example pan tapers

So what should you use? Probably -3dB, since that’s the most common value. Better still, try to avoid panning constant sounds around too much, to avoid detecting changes in level as the sound moves. It’s nearly impossible to make the levels seem constant in the studio, in homes, and on headphones. If your sources are static in position, the pan taper you use doesn’t matter at all!


  1. It might sound better in the studio, but the consumer never hears it in the studio. They’ll hear it at home, in the car, and on headphones. What happens in the studio is almost irrelevant! 

Next Scene

A few months ago I wrote about Daniel Mintseris’ Lynda.com course on Ableton Live. I’ve finally had a chance to implement most of his advice, but I had one significant issue to overcome before I could fully port our set from Arrangement View to Session View.

In Arrangement View, we had the entire set laid out start to finish. In Session View, with each song setup as one scene, I needed a way to automatically fire the subsequent scene. I may not do this forever, but this would allow me to complete the migration without disrupting our current show strategy.

Firing a scene automatically seemed like a perfect job for Max4Live. In fact, Daniel pointed me toward Isotonik Studio’s Follow device to accomplish this, but I couldn’t get my head around it and found the documentation lacking. This seemed like a good opportunity to explore the M4L API, too.

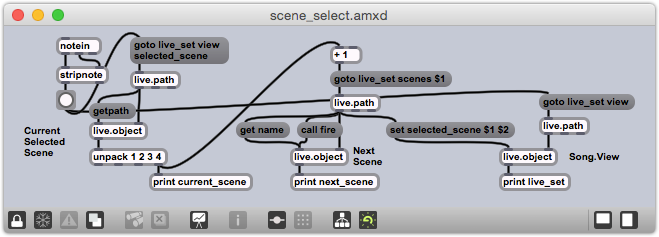
This is what I ended up building. It may not be pretty (yet), but it’s getting the job done, and I thought I’d share how it works:

Scene Select Max4Live Device

The high level process is:

  1. Figure out which scene is currently selected.
  2. Get the ID of the next scene.
  3. Send a message to the view to select that next scene.

As always, the devil is in the details:

  1. The device monitors incoming MIDI notes via notein.
  2. stripnote removes the note-off messages, so only the note-on messages are sent to button.
  3. The button is there to provide a visual cue when the device fires, but also to allow for simple debugging. It converts the note-on messages into simple bangs.
  4. The bang fires a goto live_set view selected_scene message to a live.path object, which then generates the ID of the currently selected scene at its left output.
  5. A live.object receives the ID of the selected scene, and then immediately receives a getpath message. This message produces the canonical path of the currently selected scene.
  6. The fourth argument of the path is the number of the currently selected scene; the unpack object isolates this number.
  7. The current scene number is incremented and passed into the goto live_set scenes $1 message, which is then passed to a second live.path object to get the unique ID of the next scene.
  8. Now that we’ve found the ID of the next scene, we can set it with the set selected_scene $1 $2 message. This is sent to another live.object that represents the Live View.

As it currently stands, any MIDI note-on will fire the action. I plan to extend the behavior to be able to jump to specific scenes, and I’ll use the note number as the scene number. I believe I’ll use note 0 to represent the ‘next scene’ action, so that’s what I’m using for this behavior in our current set.

Snow Day

For the first time in a very long time, I’ve crossed a major goal off my list. I finally shipped an iOS app, albeit a very simple app.

Snow Day is a single-purpose weather app; it tells you how likely you are to be able to drive to work tomorrow (or today, if it’s before 10 a.m.). It ties into the Forecast.io API to pull weather data, and uses the new(-ish) Background Fetch iOS feature to pole for forecast changes from the background.

The app is free with ads and the option for a $0.99 In-App-Purchase that will disable the ads and enable background notifications. It’s been in the store for one week and seen 27 downloads (not that great, but still interesting, considering I’ve done nothing to promote it). It’s earned a whopping $0.09 from ads so far, and no one has bought the IAP yet. I’ve already submitted an update that shows 5 background notifications for free, with a prompt to purchase the IAP to unlock unlimited background notifications; we’ll see if that changes anything.

I built this in a day, during one of the many blizzards that’s pummeled New England over the last month. It turned out to be an ideal exercise in launching an app, since I’ve been tinkering with Objective-C for years now, but I had never dealt with the App Store side of things. I’m so glad I did this.

Snow Day in the App Store

Glyn Johns

I always forget about the Glyn Johns (or Recorderman) drum mic technique. I’m making a note of this here so that hopefully, the next time I’m tracking drums, I’ll remember to give this a try.

The whole technique is predicated on using four mics:

  1. A (cardioid) large-diaphragm condenser above the snare.
  2. A (cardioid) large-diaphragm condenser to the right of the floor tom.
  3. Something for the kick (try another LDC if possible).
  4. Something for the snare (probably an SM57).

The starting point is the LDC above the snare. This article at The Recording Revolution explains:

The method starts with taking your first overhead mic and placing it about 3 to 4 feet directly above the snare (or middle of the kit). It should be pointing down at the kit. Record a little bit and listen back to that one mic. You are listening for a complete balance of the kit. You want to hear a nice blend of snare, toms, and cymbals all in one mic. If you have don’t have enough of the hi and mid toms, then angle the overhead a bit towards the toms. If the cymbals are too abrasive, move the mic up a bit more. Rinse and repeat.

Then the second LDC goes to the right of the floor tom:

Take your second overhead mic and place it just to the right of your floor tom, maybe 6 inches above the rim and facing across the the tom towards the snare and hi hat.

This needs to be in phase with the first mic, so in general, you want it to be the same distance from the snare as the first mic is. What will this do to the kick drum phase, though? Something to pay attention to.

The last two mics are close mics, used as is typical. And I suppose you could add in close mics on the toms or anything else you wanted…

Meridian MQA

At CES earlier this year, Meridian announced their new MQA audio format. Supposedly the problem they’re trying to solve is that of packing high-quality audio into low(er)-bandwidth audio streams. I’ve been hearing grumblings that they may have made some fairly questionable decisions regarding data prioritization1, so I was searching for any technical data they may have released.

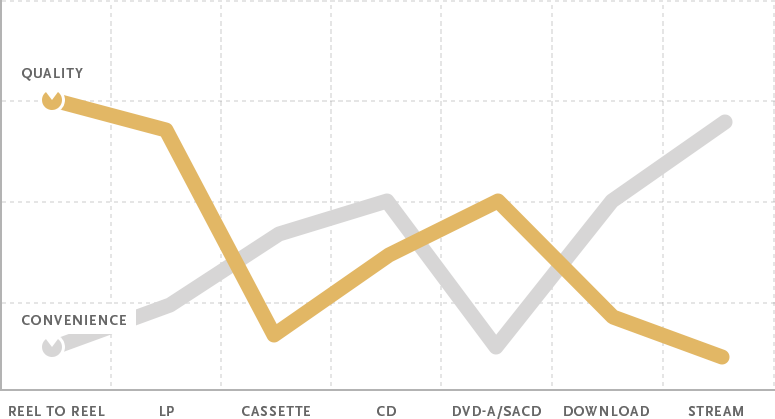
This post isn’t actually about the technical implementation of MQA, though. It’s about the absurdity of their marketing materials for MQA. In particular, this graph set me off:

Quality and convenience trade-off graph

There are so many things wrong here. In what world do DVD-A, SACD or even just regular old CDs have lower quality than LPs? Let’s just look at frequency response and dynamic range. LPs generally only contain frequency information up to 20KHz2. All three digital storage forms exceed that, with DVD-A and SACD blowing it out of the water. LPs typically have a dynamic range of only 60-70dB3, while CDs can store 96dB, and a DVD-A disc with 24-bit audio stores 144dB (wider than the range from the threshold of pain to the threshold of hearing!).

I also take issue with the convenience plot. I can’t accept that DVD-A and SACD were less convenient than LPs. You may not have had portable music players that could handle either format, but you were a lot more likely to be able to listen to DVD-A/SACD in your car than LPs. And downloads have been far more convenient than CDs from the introduction of the first iPod, which could hold the equivalent of ~7 CDs (when ripped at CD quality) in physical volume of just one.

At the end of the day, this marketing is just playing up to tropes in the audiophile world. I know that. I shouldn’t let it get to me like this. But I also can’t accept an audio format that’s predicated on misinformation as opposed to a strong technical foundation.


  1. This thread discusses some of the patents they’ve filed for, and it looks like they’re trading off bit depth to maintain frequency information above 20KHz. Thumbs down. 

  2. From Wikipedia:

    An essential feature of all cutting lathes—including the Neumann cutting lathes—is a forcibly imposed high frequency roll-off above the audio band (>20 kHz).

  3. Again, from Wikipedia:

    The dynamic range of a direct-cut vinyl record may surpass 70 dB.

Spinning Off a Git Repo

I’ve been hacking away at this one project for the last three-plus years. It started out with a limited scope, and it made sense to keep it buried in an existing git repo - it was closely related to the rest of the code base. Quickly the scope grew, and for the last two years I’ve known I should pull it out into its own repo. That’s a daunting project, so I kept putting it off.

Until today. This codebase is going to get some wider circulation, so it was finally time to take the plunge. Greg Bayer put together a fantastic guide for how to get this done: Moving Files from one Git Repository to Another, Preserving History. I’m capturing the commands here, just in case I ever need to do this again.

First, make a local clone of the starting repository, and filter out everything except the subdirectory of interest:

git clone <git repository A url>
cd <git repository A directory>
git remote rm origin
git filter-branch --subdirectory-filter <directory 1> -- --all

Then, clone the destination repository, and pull in the master branch of your stripped local clone of the starting repository:

git clone <git repository B url>
cd <git repository B directory>
git remote add repo-A-branch <git repository A directory>
git pull repo-A-branch master
git remote rm repo-A-branch

I probably would have tried to pull this off in my working copies of the two repositories, so Greg’s comments to start with new clones and then disconnect them from the remote were solid.

Omnifocus Forecast Discrepancies

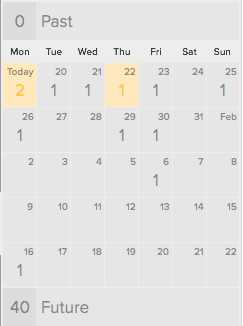
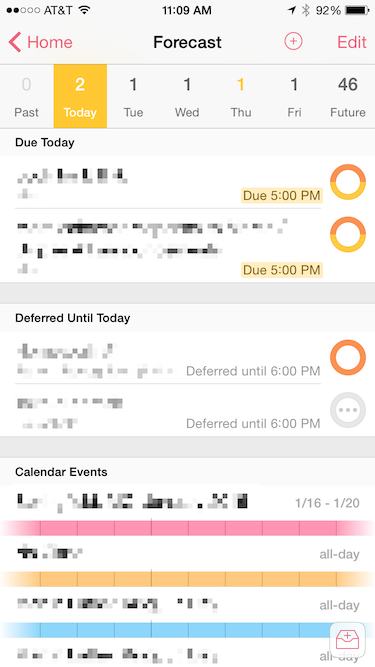
I’ve been a dedicated Omnifocus user for about three years, and I’m a big fan of the 2.0 releases on all three platforms (Mac, iPhone, iPad). With the recent 2.0 update on iPad, we saw a move towards the styling of the iPhone Forecast Perspective. There’s one quirk about it that’s making me crazy, though. Pay attention to Due count on each day, and which days are highlighted.

On the Mac, we can see a whole month. Today (Monday the 19th) and Thursday (the 22nd) are highlighted because there are available tasks that are due on those days:

Omnifocus Forecast Perspective - Mac

On the iPhone, the same days are highlighted:

Omnifocus Forecast Perspective - iPhone

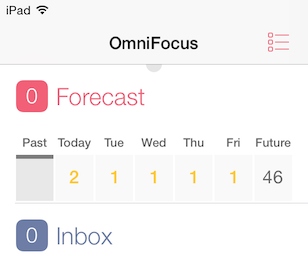
But on the iPad, all of the days are highlighted, whether or not the tasks are available (in this case, they’re blocked by their Start Dates):

Omnifocus Forecast Perspective - iPad

This affordance on the Mac and iPhone has become a key part of how I use Omnifocus - days that aren’t highlighted mean I don’t need to look at them urgently. Days that are highlighted require attention.

In Ken Case’s plan for 2015, he wrote:

It’s time to make OmniFocus for iPhone just as capable as OmniFocus for iPad is, bringing over all those features like Review mode and the ability to build custom perspectives.

I do hope that before they port the iPad implementation over to the iPhone they’re able to incorporate this design detail back into the iPad.


Update January 20, 2015:

Ken Case responded:


Listening To Storage

This is why audiophiles get a bad name. Right out of the gates:

Anecdotal murmurings and some limited first-hand experience suggested that digital music files can sound different when played from different computer media sources. […] We readily confirmed that the final sound quality is influenced not only by the choice of network player, DAC, digital cables, or indeed many other long-recognized factors, but additionally — and quite markedly — by the manner in which we now store large quantities of our music at home.

It’s so hard to even know where to begin with this, but let’s just assume the author’s assertion that all of those other factors affect sound quality1. The entire design of the experiment, in addition to being poorly documented2, is just dumb.

This initial trial was not intended to be an exhaustive study into all the factors that can affect the sound quality of network and computer audio, only to confirm or deny the suspicion that digital bitstream coming from hard disks are not all equal. Which has to be somewhat surprising, to say the least.

Thoughts:

  1. The author readily acknowledges they didn’t control for a number of factors…
  2. …but still concludes that the digital bitstream coming from the hard disks are not equal.

This assertion can be directly3 tested, for instance, with MD5. If you directly test the accuracy of the data coming from the drives, you can eliminate all of the factors that are uncontrolled, the most troublesome being the subjective comparison: the listening.

Either the disks are accurately reproducing the data or they’re not. And if they’re not, it seems much more likely that you’d wind up with completely corrupted files than a ‘more tuneful’ rendering of the music:

QNAP2 rendered the same song more tunefully. It was more organic and made more sense, the lines of melody and rhythm cooperating better. As well as showing better individual instrument distinction, the whole piece sounded tidier, tonally less messy without the roughened HF, and perhaps better integrated in musical intent.

Next, someone will probably claim vinyl sounds better.


  1. DACs, yes. Digital cables? If the PLL of the receiver can reconstruct the clock with low jitter, then the cable doesn’t matter. 

  2. How were the listening tests done? If the switching times between playback systems were at all substantial, it would swamp our echoic memory capacity. Was ABX testing employed? Can they reliably determine which NAS is which, with statistical significance? 

  3. Sorry for all the italics. This just makes me so angry. 

Flying with Instruments

Finally, the DoT has issued a ruling making clear that musicians are allowed to bring their instruments as carry-on luggage for flights. There are two catches, though:

  1. The airlines don’t have to prioritize the instrument, so once the bins are full, you’re SOL. The DoT suggests paying extra for priority boarding to ensure you have safe.
  2. The instrument still has to fit in the overheard bin. If it doesn’t, you’re stuck buying an extra seat to keep it in the luggage compartment.

Here’s a direct link to the final rule. You’ll probably want to have a copy of that with you when the airlines inevitably misinterpret your rights.

via Consumerist

Cars Best Deals Plus

After a bit of a rough patch while driving home from the holidays, I had to navigate my first solo new car buying experience. I wanted to document the pricing data I found, and the steps I took to negotiate a price, and the continued degradation of the Consumer Reports brand.

A Chevy HHR with the front end compressed.

Consumer Reports

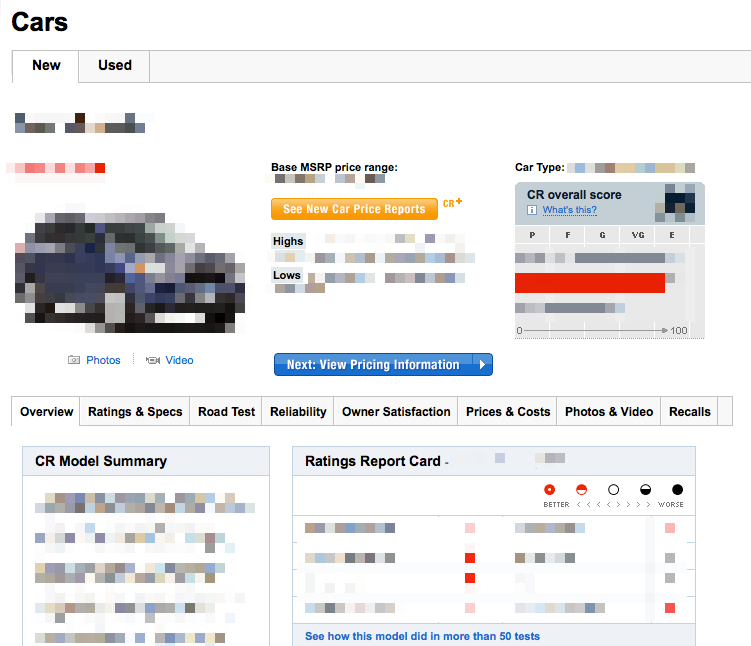
First, Consumer Report’s Cars Best Deals Plus, though terribly named, is absolutely worth the $13 price for the year. On the other hand, avoid their Build and Buy Car Buying Service at all costs1 - I tried it at 11pm, and woke up with 30+ emails and started getting phone calls from dealers at 8:30am. The biggest problem here is that they’re constantly trying to push you into the Build and Buy Service. You need to avoid the blue buttons to keep from becoming a lead, and the blue buttons absolutely do not make it clear where you’re being taken:

Consumer Reports Screenshot

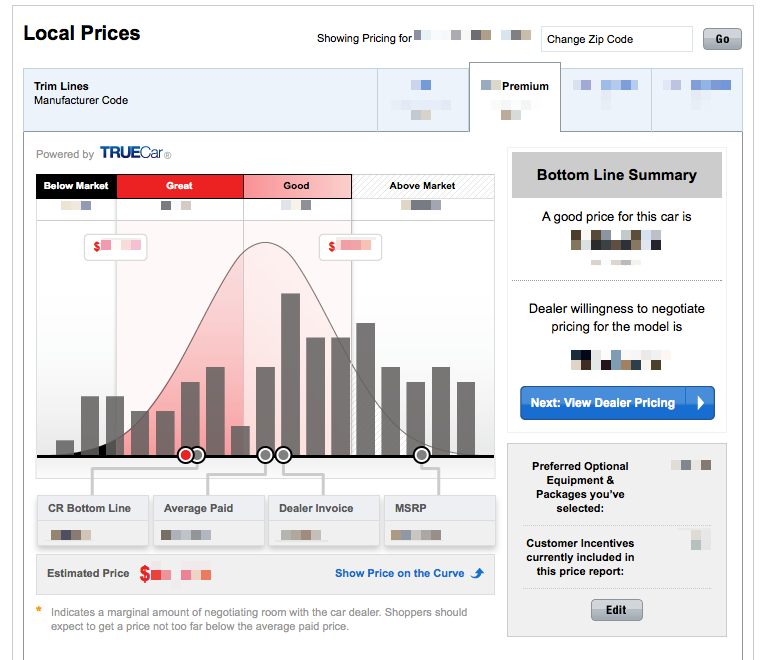
The gold button leads to some tremendously useful data, including the CR Bottom Line Price. This price is invoice minus dealer incentives and holdbacks, so in theory it represents $0 profit to the dealer. You also gain access to some data about the distribution of prices people paid for their cars, and interestingly, some do get lower prices than the CR Bottom Line Price2:

Price distribution data

The best part about the Price Report is that you can configure it with the specific options on a car, so if you’re negotiating between dealers with slightly different cars, you can adjust your offers accordingly.

How we negotiated

Having the specifc Price Reports was really helpful: I went through the inventory of all of the dealers within 50 miles, found every car that matched our color and trim choice, and then came up with offers that were comparable given the specific options on the vehicles. I called them all first thing one morning, made aggressive offers for specific cars they had on their lots, and worked them against each other for a little while3.

Each dealer also had a different “Doc Fee”, which should really just be considered part of the car price. I inquired about that at the top of my call and incorporated their numbers into my offers (they varied from $279 to $398 over the dealers I contacted). We wound up just above the CR Bottom Line Price after the fees (which I don’t think are included in the curve shown above).

My only regret was that, in my haste as I was making calls, I overlooked calling back the first dealer we met with, who gave us a test drive. I should have given him another chance to win our business, to at least match the best offer we had, since he had put the most time into us as we shopped.

Bottom line: The CR Price Report was worth the money, but avoid the Build and Buy Service.


  1. Despite the slightly improved name. 

  2. I’ve blurred out the useful data here, so I can’t believe CR would be ok with me republishing it. Seriously, it’s worth the subscription cost to get access to this, if you’re about to spend $20,000+ on a car. 

  3. It probably didn’t hurt that it was the end of the month and the end of the year, so they were willing to move a car without a lot of profit to get their numbers up.