Monthly Archives: February 2015

Next Scene

A few months ago I wrote about Daniel Mintseris’ Lynda.com course on Ableton Live. I’ve finally had a chance to implement most of his advice, but I had one significant issue to overcome before I could fully port our set from Arrangement View to Session View.

In Arrangement View, we had the entire set laid out start to finish. In Session View, with each song setup as one scene, I needed a way to automatically fire the subsequent scene. I may not do this forever, but this would allow me to complete the migration without disrupting our current show strategy.

Firing a scene automatically seemed like a perfect job for Max4Live. In fact, Daniel pointed me toward Isotonik Studio’s Follow device to accomplish this, but I couldn’t get my head around it and found the documentation lacking. This seemed like a good opportunity to explore the M4L API, too.

This is what I ended up building. It may not be pretty (yet), but it’s getting the job done, and I thought I’d share how it works:
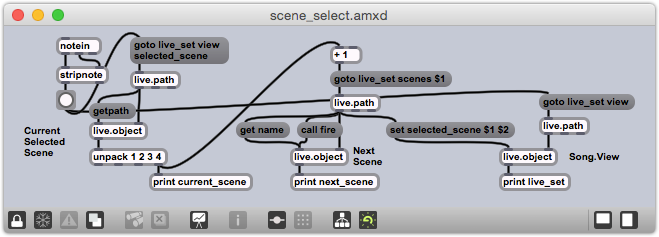
Scene Select Max4Live Device

The high level process is:

  1. Figure out which scene is currently selected.
  2. Get the ID of the next scene.
  3. Send a message to the view to select that next scene.

As always, the devil is in the details:

  1. The device monitors incoming MIDI notes via notein.
  2. stripnote removes the note-off messages, so only the note-on messages are sent to button.
  3. The button is there to provide a visual cue when the device fires, but also to allow for simple debugging. It converts the note-on messages into simple bangs.
  4. The bang fires a goto live_set view selected_scene message to a live.path object, which then generates the ID of the currently selected scene at its left output.
  5. A live.object receives the ID of the selected scene, and then immediately receives a getpath message. This message produces the canonical path of the currently selected scene.
  6. The fourth argument of the path is the number of the currently selected scene; the unpack object isolates this number.
  7. The current scene number is incremented and passed into the goto live_set scenes $1 message, which is then passed to a second live.path object to get the unique ID of the next scene.
  8. Now that we’ve found the ID of the next scene, we can set it with the set selected_scene $1 $2 message. This is sent to another live.object that represents the Live View.

As it currently stands, any MIDI note-on will fire the action. I plan to extend the behavior to be able to jump to specific scenes, and I’ll use the note number as the scene number. I believe I’ll use note 0 to represent the ‘next scene’ action, so that’s what I’m using for this behavior in our current set.
Snow Day

For the first time in a very long time, I’ve crossed a major goal off my list. I finally shipped an iOS app, albeit a very simple app.

Snow Day is a single-purpose weather app; it tells you how likely you are to be able to drive to work tomorrow (or today, if it’s before 10 a.m.). It ties into the Forecast.io API to pull weather data, and uses the new(-ish) Background Fetch iOS feature to pole for forecast changes from the background.

The app is free with ads and the option for a $0.99 In-App-Purchase that will disable the ads and enable background notifications. It’s been in the store for one week and seen 27 downloads (not that great, but still interesting, considering I’ve done nothing to promote it). It’s earned a whopping $0.09 from ads so far, and no one has bought the IAP yet. I’ve already submitted an update that shows 5 background notifications for free, with a prompt to purchase the IAP to unlock unlimited background notifications; we’ll see if that changes anything.

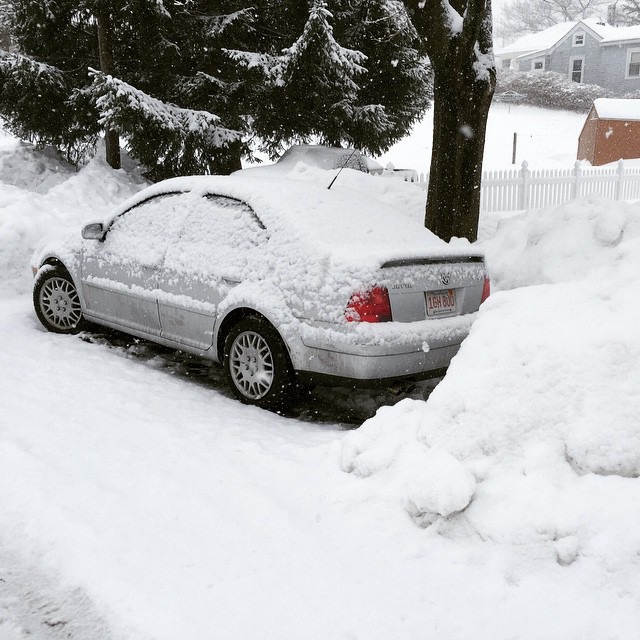
I built this in a day, during one of the many blizzards that’s pummeled New England over the last month. It turned out to be an ideal exercise in launching an app, since I’ve been tinkering with Objective-C for years now, but I had never dealt with the App Store side of things. I’m so glad I did this.

Snow Day in the App Store

Glyn Johns

I always forget about the Glyn Johns (or Recorderman) drum mic technique. I’m making a note of this here so that hopefully, the next time I’m tracking drums, I’ll remember to give this a try.

The whole technique is predicated on using four mics:

  1. A (cardioid) large-diaphragm condenser above the snare.
  2. A (cardioid) large-diaphragm condenser to the right of the floor tom.
  3. Something for the kick (try another LDC if possible).
  4. Something for the snare (probably an SM57).

The starting point is the LDC above the snare. This article at The Recording Revolution explains:

The method starts with taking your first overhead mic and placing it about 3 to 4 feet directly above the snare (or middle of the kit). It should be pointing down at the kit. Record a little bit and listen back to that one mic. You are listening for a complete balance of the kit. You want to hear a nice blend of snare, toms, and cymbals all in one mic. If you have don’t have enough of the hi and mid toms, then angle the overhead a bit towards the toms. If the cymbals are too abrasive, move the mic up a bit more. Rinse and repeat.

Then the second LDC goes to the right of the floor tom:

Take your second overhead mic and place it just to the right of your floor tom, maybe 6 inches above the rim and facing across the the tom towards the snare and hi hat.

This needs to be in phase with the first mic, so in general, you want it to be the same distance from the snare as the first mic is. What will this do to the kick drum phase, though? Something to pay attention to.

The last two mics are close mics, used as is typical. And I suppose you could add in close mics on the toms or anything else you wanted…

Meridian MQA

At CES earlier this year, Meridian announced their new MQA audio format. Supposedly the problem they’re trying to solve is that of packing high-quality audio into low(er)-bandwidth audio streams. I’ve been hearing grumblings that they may have made some fairly questionable decisions regarding data prioritization1, so I was searching for any technical data they may have released.

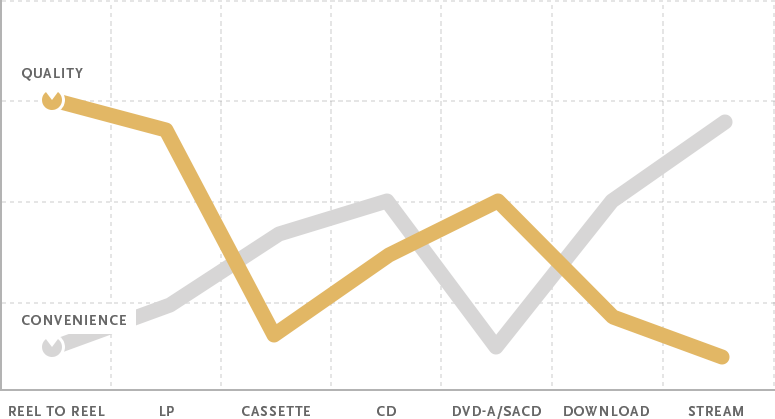
This post isn’t actually about the technical implementation of MQA, though. It’s about the absurdity of their marketing materials for MQA. In particular, this graph set me off:

Quality and convenience trade-off graph

There are so many things wrong here. In what world do DVD-A, SACD or even just regular old CDs have lower quality than LPs? Let’s just look at frequency response and dynamic range. LPs generally only contain frequency information up to 20KHz2. All three digital storage forms exceed that, with DVD-A and SACD blowing it out of the water. LPs typically have a dynamic range of only 60-70dB3, while CDs can store 96dB, and a DVD-A disc with 24-bit audio stores 144dB (wider than the range from the threshold of pain to the threshold of hearing!).

I also take issue with the convenience plot. I can’t accept that DVD-A and SACD were less convenient than LPs. You may not have had portable music players that could handle either format, but you were a lot more likely to be able to listen to DVD-A/SACD in your car than LPs. And downloads have been far more convenient than CDs from the introduction of the first iPod, which could hold the equivalent of ~7 CDs (when ripped at CD quality) in physical volume of just one.

At the end of the day, this marketing is just playing up to tropes in the audiophile world. I know that. I shouldn’t let it get to me like this. But I also can’t accept an audio format that’s predicated on misinformation as opposed to a strong technical foundation.


  1. This thread discusses some of the patents they’ve filed for, and it looks like they’re trading off bit depth to maintain frequency information above 20KHz. Thumbs down. 

  2. From Wikipedia:

    An essential feature of all cutting lathes—including the Neumann cutting lathes—is a forcibly imposed high frequency roll-off above the audio band (>20 kHz).

  3. Again, from Wikipedia:

    The dynamic range of a direct-cut vinyl record may surpass 70 dB.