Category Archives: General

MTAudioProcessingTap Biquad Demo

I’ve shared an example iOS project on Github that demonstrates how to use the audioProcessingTap property on AVPlayer to process music in the iPod Music Library. I cribbed liberally from Chris’ Coding Blog, NVDSP, and the Learning Core Audio Book.

Chris’ Coding Blog shows how to set up the audioProcessingTap with an MTAudioProcessingTap struct, and in his example he uses the Accelerate framework to apply a volume gain:

#define LAKE_LEFT_CHANNEL (0)
#define LAKE_RIGHT_CHANNEL (1)

void process(MTAudioProcessingTapRef tap, CMItemCount numberFrames,
 MTAudioProcessingTapFlags flags, AudioBufferList *bufferListInOut,
 CMItemCount *numberFramesOut, MTAudioProcessingTapFlags *flagsOut)
{
    OSStatus err = MTAudioProcessingTapGetSourceAudio(tap, numberFrames, bufferListInOut,
                   flagsOut, NULL, numberFramesOut);
    if (err) NSLog(@"Error from GetSourceAudio: %ld", err);

    LAKEViewController *self = (__bridge LAKEViewController *) MTAudioProcessingTapGetStorage(tap);

    float scalar = self.slider.value;

    vDSP_vsmul(bufferListInOut->mBuffers[LAKE_RIGHT_CHANNEL].mData, 1, &scalar, bufferListInOut->mBuffers[LAKE_RIGHT_CHANNEL].mData, 1, bufferListInOut->mBuffers[LAKE_RIGHT_CHANNEL].mDataByteSize / sizeof(float));
    vDSP_vsmul(bufferListInOut->mBuffers[LAKE_LEFT_CHANNEL].mData, 1, &scalar, bufferListInOut->mBuffers[LAKE_LEFT_CHANNEL].mData, 1, bufferListInOut->mBuffers[LAKE_LEFT_CHANNEL].mDataByteSize / sizeof(float));
}

The NVDSP class implementation in NVDSP shows an example of using the vDSP_deq22() routine to filter using a biquad:

- (void) filterContiguousData: (float *)data numFrames:(UInt32)numFrames channel:(UInt32)channel {

    // Provide buffer for processing
    float tInputBuffer[numFrames + 2];
    float tOutputBuffer[numFrames + 2];

    // Copy the data
    memcpy(tInputBuffer, gInputKeepBuffer[channel], 2 * sizeof(float));
    memcpy(tOutputBuffer, gOutputKeepBuffer[channel], 2 * sizeof(float));
    memcpy(&(tInputBuffer[2]), data, numFrames * sizeof(float));

    // Do the processing
    vDSP_deq22(tInputBuffer, 1, coefficients, tOutputBuffer, 1, numFrames);

    // Copy the data
    memcpy(data, tOutputBuffer + 2, numFrames * sizeof(float));
    memcpy(gInputKeepBuffer[channel], &(tInputBuffer[numFrames]), 2 * sizeof(float));
    memcpy(gOutputKeepBuffer[channel], &(tOutputBuffer[numFrames]), 2 * sizeof(float));
}

You’ll also see the CheckError() function the Learning Core Audio Book.

I pieced these together to implement a variable lowpass filter on music in the iPod Music Library. It wasn’t too complicated, though I’m sure there are problems with this implementation. Feel free to make use of this code, and I’ll definitely accept pull requests if anyone finds this useful.

Here’s the header for ProcessedAudioPlayer.h:

#import <Foundation/Foundation.h>

@interface ProcessedAudioPlayer : NSObject

@property (strong, nonatomic) NSURL *assetURL;
@property (nonatomic) BOOL filterEnabled;
@property (nonatomic) float filterCornerFrequency;
@property (nonatomic) float volumeGain;

@end

And the body, ProcessedAudioPlayer.m:

#import "ProcessedAudioPlayer.h"
@import AVFoundation;
@import Accelerate;

#define CHANNEL_LEFT 0
#define CHANNEL_RIGHT 1
#define NUM_CHANNELS 2

#pragma mark - Struct

typedef struct FilterState {
    float *gInputKeepBuffer[NUM_CHANNELS];
    float *gOutputKeepBuffer[NUM_CHANNELS];
    float coefficients[5];
    float gain;
} FilterState;

#pragma mark - Audio Processing

static void CheckError(OSStatus error, const char *operation)
{
    if (error == noErr) return;

    char errorString[20];
    // see if it appears to be a 4-char-code
    *(UInt32 *)(errorString + 1) = CFSwapInt32HostToBig(error);
    if (isprint(errorString[1]) && isprint(errorString[2]) && isprint(errorString[3]) && isprint(errorString[4])) {
        errorString[0] = errorString[5] = '\'';
        errorString[6] = '\0';
    } else
        // no, format it as an integer
        sprintf(errorString, "%d", (int)error);

    fprintf(stderr, "Error: %s (%s)\n", operation, errorString);

    exit(1);
}

OSStatus BiquadFilter(float* inCoefficients,
                      float* ioInputBufferInitialValue,
                      float* ioOutputBufferInitialValue,
                      CMItemCount inNumberFrames,
                      void* ioBuffer) {

    // Provide buffer for processing
    float tInputBuffer[inNumberFrames + 2];
    float tOutputBuffer[inNumberFrames + 2];

    // Copy the two frames we stored into the start of the inputBuffer, filling the rest with the current buffer data
    memcpy(tInputBuffer, ioInputBufferInitialValue, 2 * sizeof(float));
    memcpy(tOutputBuffer, ioOutputBufferInitialValue, 2 * sizeof(float));
    memcpy(&(tInputBuffer[2]), ioBuffer, inNumberFrames * sizeof(float));

    // Do the filtering
    vDSP_deq22(tInputBuffer, 1, inCoefficients, tOutputBuffer, 1, inNumberFrames);

    // Copy the data
    memcpy(ioBuffer, tOutputBuffer + 2, inNumberFrames * sizeof(float));
    memcpy(ioInputBufferInitialValue, &(tInputBuffer[inNumberFrames]), 2 * sizeof(float));
    memcpy(ioOutputBufferInitialValue, &(tOutputBuffer[inNumberFrames]), 2 * sizeof(float));

    return noErr;
}

@interface ProcessedAudioPlayer () {
    FilterState filterState;
}

@property (strong, nonatomic) AVPlayer *player;

@end

@implementation ProcessedAudioPlayer

#pragma  mark - Lifecycle

- (instancetype)init {
    self = [super init];
    if (self) {
        _filterEnabled = true;
        _filterCornerFrequency = 1000.0;

        // Setup FilterState struct
        for (int i = 0; i < NUM_CHANNELS; i++) {
            filterState.gInputKeepBuffer[i] = (float *)calloc(2, sizeof(float));
            filterState.gOutputKeepBuffer[i] = (float *)calloc(2, sizeof(float));
        }
        [self updateFilterCoeffs];
        filterState.gain = 0.5;
    }

    return self;
}

- (void)dealloc {
    for (int i = 0; i < NUM_CHANNELS; i++) {
        free(filterState.gInputKeepBuffer[i]);
        free(filterState.gOutputKeepBuffer[i]);
    }
}

#pragma  mark - Setters/Getters

- (void)setVolumeGain:(float)volumeGain {
    filterState.gain = volumeGain;
}

- (float)volumeGain {
    return filterState.gain;
}

- (void)setFilterEnabled:(BOOL)filterEnabled {
    if (_filterEnabled != filterEnabled) {
        _filterEnabled = filterEnabled;
        [self updateFilterCoeffs];
    }
}

- (void)setFilterCornerFrequency:(float)filterCornerFrequency {
    if (_filterCornerFrequency != filterCornerFrequency) {
        _filterCornerFrequency = filterCornerFrequency;
        [self updateFilterCoeffs];
    }
}

- (void)setAssetURL:(NSURL *)assetURL {
    if (_assetURL != assetURL) {
        _assetURL = assetURL;

        [self.player pause];

        // Create the AVAsset
        AVAsset *asset = [AVAsset assetWithURL:_assetURL];
        assert(asset);

        // Create the AVPlayerItem
        AVPlayerItem *playerItem = [AVPlayerItem playerItemWithAsset:asset];
        assert(playerItem);

        assert([asset tracks]);
        assert([[asset tracks] count]);

        AVAssetTrack *audioTrack = [[asset tracks] objectAtIndex:0];
        AVMutableAudioMixInputParameters *inputParams = [AVMutableAudioMixInputParameters audioMixInputParametersWithTrack:audioTrack];

        // Create a processing tap for the input parameters
        MTAudioProcessingTapCallbacks callbacks;
        callbacks.version = kMTAudioProcessingTapCallbacksVersion_0;
        callbacks.clientInfo = &filterState;
        callbacks.init = init;
        callbacks.prepare = prepare;
        callbacks.process = process;
        callbacks.unprepare = unprepare;
        callbacks.finalize = finalize;

        MTAudioProcessingTapRef tap;
        // The create function makes a copy of our callbacks struct
        OSStatus err = MTAudioProcessingTapCreate(kCFAllocatorDefault, &callbacks,
                                                  kMTAudioProcessingTapCreationFlag_PostEffects, &tap);
        if (err || !tap) {
            NSLog(@"Unable to create the Audio Processing Tap");
            return;
        }
        assert(tap);

        // Assign the tap to the input parameters
        inputParams.audioTapProcessor = tap;

        // Create a new AVAudioMix and assign it to our AVPlayerItem
        AVMutableAudioMix *audioMix = [AVMutableAudioMix audioMix];
        audioMix.inputParameters = @[inputParams];
        playerItem.audioMix = audioMix;

        self.player = [AVPlayer playerWithPlayerItem:playerItem];
        assert(self.player);

        [self.player play];
    }
}

#pragma  mark - Utilities

- (void)updateFilterCoeffs {
    float a0, b0, b1, b2, a1, a2;
    if (self.filterEnabled) {
        float Fc = self.filterCornerFrequency;
        float Q = 0.7071;
        float samplingRate = 44100.0;
        float omega, omegaS, omegaC, alpha;

        omega = 2*M_PI*Fc/samplingRate;
        omegaS = sin(omega);
        omegaC = cos(omega);
        alpha = omegaS / (2*Q);

        a0 = 1 + alpha;
        b0 = ((1 - omegaC)/2);
        b1 = ((1 - omegaC));
        b2 = ((1 - omegaC)/2);
        a1 = (-2 * omegaC);
        a2 = (1 - alpha);
    } else {
        a0 = 1.0;
        b0 = 1.0;
        b1 = 0.0;
        b2 = 0.0;
        a1 = 0.0;
        a2 = 0.0;
    }

    filterState.coefficients[0] = b0/a0;
    filterState.coefficients[1] = b1/a0;
    filterState.coefficients[2] = b2/a0;
    filterState.coefficients[3] = a1/a0;
    filterState.coefficients[4] = a2/a0;
}

#pragma mark MTAudioProcessingTap Callbacks

void init(MTAudioProcessingTapRef tap, void *clientInfo, void **tapStorageOut)
{
    NSLog(@"Initialising the Audio Tap Processor");
    *tapStorageOut = clientInfo;
}

void finalize(MTAudioProcessingTapRef tap)
{
    NSLog(@"Finalizing the Audio Tap Processor");
}

void prepare(MTAudioProcessingTapRef tap, CMItemCount maxFrames, const AudioStreamBasicDescription *processingFormat)
{
    NSLog(@"Preparing the Audio Tap Processor");

    UInt32 format4cc = CFSwapInt32HostToBig(processingFormat->mFormatID);

    NSLog(@"Sample Rate: %f", processingFormat->mSampleRate);
    NSLog(@"Channels: %u", (unsigned int)processingFormat->mChannelsPerFrame);
    NSLog(@"Bits: %u", (unsigned int)processingFormat->mBitsPerChannel);
    NSLog(@"BytesPerFrame: %u", (unsigned int)processingFormat->mBytesPerFrame);
    NSLog(@"BytesPerPacket: %u", (unsigned int)processingFormat->mBytesPerPacket);
    NSLog(@"FramesPerPacket: %u", (unsigned int)processingFormat->mFramesPerPacket);
    NSLog(@"Format Flags: %d", (unsigned int)processingFormat->mFormatFlags);
    NSLog(@"Format Flags: %4.4s", (char *)&format4cc);

    // Looks like this is returning 44.1KHz LPCM @ 32 bit float, packed, non-interleaved
}

void process(MTAudioProcessingTapRef tap, CMItemCount numberFrames,
             MTAudioProcessingTapFlags flags, AudioBufferList *bufferListInOut,
             CMItemCount *numberFramesOut, MTAudioProcessingTapFlags *flagsOut)
{
    // Alternatively, numberFrames ==
    // UInt32 numFrames = bufferListInOut->mBuffers[LAKE_RIGHT_CHANNEL].mDataByteSize / sizeof(float);

    CheckError(MTAudioProcessingTapGetSourceAudio(tap,
                                                  numberFrames,
                                                  bufferListInOut,
                                                  flagsOut,
                                                  NULL,
                                                  numberFramesOut), "GetSourceAudio failed");

    FilterState *filterState = (FilterState *) MTAudioProcessingTapGetStorage(tap);

    float scalar = filterState->gain;

    vDSP_vsmul(bufferListInOut->mBuffers[CHANNEL_RIGHT].mData,
               1,
               &scalar,
               bufferListInOut->mBuffers[CHANNEL_RIGHT].mData,
               1,
               numberFrames);
    vDSP_vsmul(bufferListInOut->mBuffers[CHANNEL_LEFT].mData,
               1,
               &scalar,
               bufferListInOut->mBuffers[CHANNEL_LEFT].mData,
               1,
               numberFrames);

    CheckError(BiquadFilter(filterState->coefficients,
                            filterState->gInputKeepBuffer[1],//self.gInputKeepBuffer1,
                            filterState->gOutputKeepBuffer[1],//self.gOutputKeepBuffer1,
                            numberFrames,
                            bufferListInOut->mBuffers[CHANNEL_RIGHT].mData), "Couldn't process Right channel");

    CheckError(BiquadFilter(filterState->coefficients,
                            filterState->gInputKeepBuffer[0],//self.gInputKeepBuffer0,
                            filterState->gOutputKeepBuffer[0],//self.gOutputKeepBuffer0,
                            numberFrames,
                            bufferListInOut->mBuffers[CHANNEL_LEFT].mData), "Couldn't process Left channel");
}

void unprepare(MTAudioProcessingTapRef tap)
{
    NSLog(@"Unpreparing the Audio Tap Processor");
}

@end
Pro Tools Live

I just watched James’ Live Pro Tools Playback Rig on Pro Tools Expert, mainly because I was curious to learn what advantages he found with Pro Tools over Ableton Live (which I’ve written about previously).

He uses four outputs from an Audient iD22 to drive:

  • Stereo mains
  • Bass to the PA
  • Click track to his in-ears

He sets their gig up as a linear show, and effectively just presses play. He has memory markers he can use to jump around in the set, in case they decide to change something on the fly.

The biggest tips he offers are:

  1. Set the buffer size to the maximum supported; since he’s not recording anything, the latency doesn’t matter and this increases stability.
  2. Remove unneeded plugins from the machine.

But what are the advantages over Ableton Live? He addresses this at the end of the video:

The thing that most people say is “Why don’t you use Ableton Live, Live?”, and there’s a really simple answer: I don’t know it as well as I know Pro Tools.

That seems completely reasonable, and I’ll be sticking with Ableton.

M4L - Clip Detection

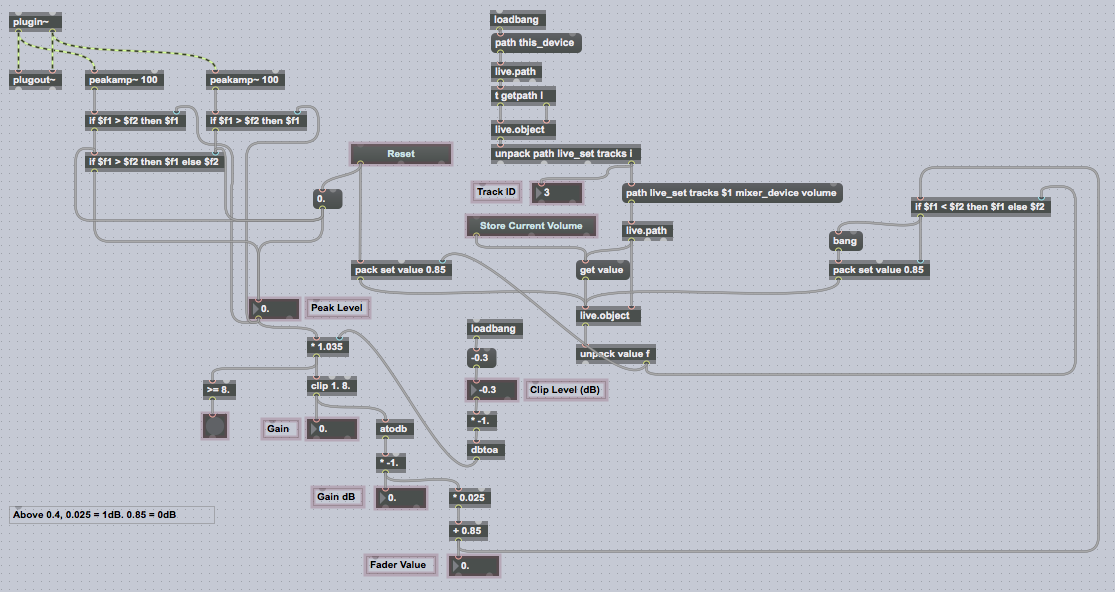
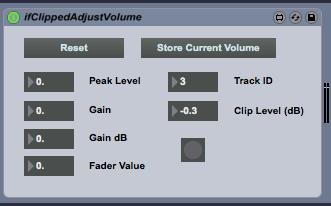
I built a Max4Live device that monitors a track for clipping and adjusts the track volume to keep from clipping the mixer. Here’s the presentation view of the device:

ifClippedAdjustVolume Device Overview

And here’s the complete logic:

Device Logic

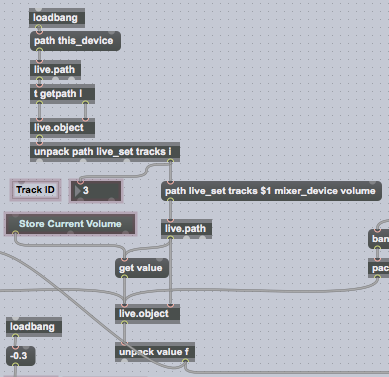
The device works by identifying the track it’s placed on, by requesting the path this_device, and reading the current volume setting off of the track:

Track Identification Logic

The track volume is saved, so if the Reset button is pushed, the original track volume setting can be restored. The Store Current Volume button will update the cached volume setting.

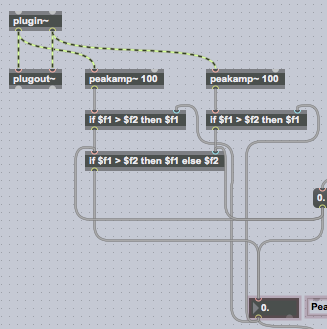
Separately, the device uses the peakamp~ block to get an updated peak amplitude value of the audio every 100ms. It takes the maximum value of the two audio tracks. The value is retained until the Reset button is clicked:

Level Detect Logic

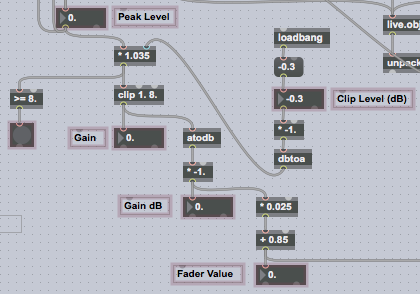
The peak amplitude is compared to a clipping threshold, set to -0.3 dBFS by default, and a new volume setting is calculated. Currently the volume setting is limited to +6 dB to -18dB. Over that range there’s a linear relationship between the volume control and the gain: 0.025 per 1 dB of adjustment, where 0.85 yields 0 dB:

Volume Update Logic

There are a couple things I’d still like to do with this device:

  • Modify it to work on the Master output. Currently, the device doesn’t properly detect the track when it’s on the Master, so it can’t adjust the volume.
  • Extend the range of control beyond -18 dB.

The device is available on Github. I’d be happy to review any pull requests. It’s also listed on maxforlive.com. I’m distributing it under the CC BY-SA 4.0 license.

Pro Tools 12.5

It looks like Pro Tools 12.4 is the end of the line for me. I purchased a student license of Pro Tools 10 back on March 17, 2012. It was quite a deal — it included four years of free updates.

With the news that Pro Tools 12.5 will likely drop on March 31, 2016, that will mark the first release that is not included in the package I bought. I can’t complain - I spent $293.95, and I’ve definitely gotten my worth out of it. But now I’m faced with a decision regarding how to move forward. My options appear to be:

  • Spend $300-360/year on a subscription or Annual Upgrade plan
  • Do nothing, and continue to use Pro Tools 12.4 until I see a compelling reason to update.

I’m leaning heavily towards doing nothing. The cloud collaboration tools of version 12.5 aren’t enough to spur me to action. At the current pricing for Pro Tools, I’d be very tempted to spend $200 on Logic X, to thoroughly evaluate it, delaying a Pro Tools update by 8 months to offset the cost.

But for now, I’ll just wait and see how my needs evolve.

MathJax with WordPress

It’s not something I do regularly, but occasionally I like to include equations in my writing here. MathJax seems to be the consensus choice for equation presentation today, and it meets all of my criteria:

  • Uses the LaTeX equation format, which is as portable as these things come.
  • Does not require the use of fixed resolution images.
  • Can take advantage of browser support for MathML.

Dr. Drang wrote a post a while back about his modifications to PHP-Markdown-Extra to include support for MathJax. I’m still using the canonical version of PHP-Markdown, and I’d prefer to stay on the main development branch, so I went searching for alternatives. What I found is the MathJax-LaTeX WordPress Plugin. In combination with PHP-Markdown, this site turns this:


<p>
\\[ \begin{align}
{gain}_{left} & = \left( \cos { \frac{2}{\pi} \color{red}{pan}} \right) \\\
{gain}_{right} & = \left( \sin { \frac{2}{\pi} \color{red}{pan}} \right)
\end{align} \\]
</p>

Into this:

\[ \begin{align} {gain}_{left} & = \left( \cos { \frac{2}{\pi} \color{red}{pan}} \right) \\ {gain}_{right} & = \left( \sin { \frac{2}{\pi} \color{red}{pan}} \right) \end{align} \]

There are a couple of things to note about this. First, I have to wrap the whole equation in <p> tags in order to keep PHP-Markdown from trying to parse it. Second, while the documentation for MathJax indicates thet only a single backslash is required to kick off a block, I need to use two, the first to escape the second (I think). Finally, I need to include the Shortcode to have MathJax included on the page. This is actually great, because it means that the scripts are only loaded when they’re truly needed.

Marked 2 also supports MathJax, so I’m able to fully preview my equations before pushing them live on this site, which is great, because I don’t know LaTeX equation syntax well enough to get it right on the first try.

Removing Comments RSS Feeds from WordPress

Looking at the headers for this site, I found links to four types of RSS feeds:

  1. The main posts RSS feed:

    <link rel="alternate" type="application/rss+xml" title="Jeff Vautin &raquo; Feed" href="http://jeffvautin.com/feed/" />
    
  2. The main comments RSS feed:

    <link rel="alternate" type="application/rss+xml" title="Jeff Vautin &raquo; Comments Feed" href="http://jeffvautin.com/comments/feed/" />
    
  3. Category RSS feeds, such as:

    <link rel="alternate" type="application/rss+xml" title="Jeff Vautin &raquo; Tremolo Pedal Category Feed" href="http://jeffvautin.com/category/tremolo-pedal/feed/" />
    
  4. Individual posts comment RSS feeds, like:

    <link rel="alternate" type="application/rss+xml" title="Jeff Vautin &raquo; Tremolo Pedal - Getting Back to Work Comments Feed" href="http://jeffvautin.com/2009/01/tremolo-pedal-getting-back-to-work/feed/" />
    

Since I’ve disabled comments on this site, I’d also like to stop advertising the existence of the comment feeds to my visitors. A quick web search turned up a lot of misinformation, but here’s what I found that worked.

Per these instructions, I first commented out this line in the theme’s functions.php file, to remove the main posts feed and main comment feed from all pages:

// add_theme_support( 'automatic-feed-links' );

But I actually want to keep the main posts feed, so I manually added it back in header.php, right before <?php wp_head(); ?>:

<link rel="alternate" type="application/rss+xml" title="Jeff Vautin &raquo; Feed" href="<?php bloginfo('rss2_url'); ?>" />

Next, I added this code to functions.php to to remove the comment feeds on individual sites:

// Disable comment feeds for individual posts
function disablePostCommentsFeedLink($for_comments) {
    return;
}
add_filter('post_comments_feed_link','disablePostCommentsFeedLink');

Not too complicated - three simple modifications did the trick. I tried adding this call to functions.php, in order to avoid the header.php modification, keeping all of my modifications in one file. It caused the site to go down, though, so I had to ssh in and revert my changes:

add_action('wp_head', 'addBackPostFeed');
function addBackPostFeed() {
    echo '<link rel="alternate" type="application/rss+xml" title="RSS 2.0 Feed" href="'.get_bloginfo('rss2_url').'" />'; 
}

So, next time, I won’t do this. I imagine I’ll have to recreate these changes any time there’s an update available for my theme, so having these instructions around will be useful.

Update: February 9, 2017

I moved these changes into a WordPress Child Theme.

HTTPS with Let’s Encrypt

Following these instructions from Digital Ocean, it was really easy to get HTTPS set up for my flask app with Let’s Encrypt.

Since I already have git installed, the first step is to clone the letsencrypt tool:

sudo git clone https://github.com/letsencrypt/letsencrypt /opt/letsencrypt

Move into the directory and run the tool to install a certificate:

cd /opt/letsencrypt
./letsencrypt-auto --apache -d example.com

The tool will install all of the needed dependencies. The next step is to set up auto-renewal, since Let’s Encrypt only offers 90-day certificates. Digital Ocean has provided a shell script to handle this process, but I modified it to remove the dependency on the bc tool. When the certificate is within 30 days of expiration, it will renew. The script can be installed via curl:

sudo curl -L -o /usr/local/sbin/le-renew https://gist.githubusercontent.com/jeffvautin/5d98b4f7d42ab29463e2/raw/6a4b01a4caba2efd1e3dbc97a33d2ef1f80ecf26/le-renew.sh
sudo chmod +x /usr/local/sbin/le-renew

Edit the crontab to add a recurring task:

sudo crontab -e

Then add this line to the configuration to run the update script weekly:

30 2 * * 1 /usr/local/sbin/le-renew example.com >> /var/log/le-renew.log

I’ve updated my server configuration post to include these steps. And I’ll be making a small contribution to Let’s Encrypt - they’ve made this process so simple.

POODLE Vulnerability

When I tested one server with the following link, it reported a vulnerability to the POODLE attack:

https://www.ssllabs.com/ssltest/analyze.html?d=example.com&latest

Digital Ocean also provides instructions for resolving this. You need to disable SSLv3 by editing a configuration file:

sudo nano /etc/apache2/mods-available/ssl.conf

Find the line starting with SSLProtocol and change it to:

SSLProtocol all -SSLv3 -SSLv2

And then restart Apache2:

sudo service apache2 restart

Retesting should indicate the server is now secure.

Flask App Server Setup

This is a detailed log of the steps I went through to configure a Digital Ocean Droplet to run my Flask app.

Creating the Droplet

From the Digital Ocean control panel, choose to create a new Droplet with the latest version of Ubuntu (15.10 as of this writing).

Digital Ocean recommends using the 32-bit version for servers with less than 3 GB of RAM:

A 32-bit operating system is recommended for cloud servers with less than 3 GB of RAM — this is especially true for servers with 1 GB, or less, of RAM. Processes can require significantly more memory on the 64-bit architecture. On servers with a limited amount of RAM, any performance benefits that one might gain from a 64-bit operating system would be diluted by having less memory available for buffers and caching.

Set the rest of the options up as desired. For this server, I chose:

  • The $5/month plan
  • No private networking (this will run on a single server)
  • No Backups (these instructions will get me up and running again)
  • IPv6 (since it’s harder to set it up later)1
  • No User Data (this is helpful for scripting server setup, which I’m not yet doing)

Since I already have SSH keys setup with Digital Ocean, I’ve added them to this new server. If you don’t currently have SSH keys setup, you can follow this guide - and be sure to disable password login!

Initial Configuration

Digital Ocean provides great configuration instructions.

First, create a new user with super user powers:

  • Log in:
    ssh root@droplet_ip_address
  • Create a new user:
    adduser username
  • Give new user sudo privileges:
    gpasswd -a username sudo
  • Disable root login via ssh:
    nano /etc/ssh/sshd_config
    • In that file, replace PermitRootLogin yes with PermitRootLogin no
  • Restart ssh:
    service ssh restart
  • In a new shell, verify the connection works before closing the open connection to root:
    ssh username@SERVER_IP_ADDRESS

Then, copy your ssh public key to the new user account on the server. From my Mac, I ran:
ssh-copy-id username@SERVER_IP_ADDRESS

You can view the installed keys by sshing back into the server and inspecting the ~/.ssh/authorized_keys file. The root user ssh keys live in /root/.ssh/authorized_keys.

Additional Setup

Digital Ocean has also published additional security steps that should be performed on a new Ubuntu server.

First, setup a firewall (additional details):

  • Allow SSH sessions:
    sudo ufw allow ssh
  • Allow web server sessions:
    sudo ufw allow 80/tcp
  • Allow SSL/TLS:
    sudo ufw allow 443/tcp
  • Enable the firewall:
    sudo ufw enable

Next, configure NTP and timezone data to maintain your server’s clock:

  • Configure the time zone by running this command and selecting your country and city:
    sudo dpkg-reconfigure tzdata
  • Install NTP:
    sudo apt-get update sudo apt-get install ntp
  • … that’s it. NTP will be running after the installation.

If they aren’t already configured, set up automatic updates for the server (this was setup by default for me on Ubuntu 15.10):

  • Install the package: sudo apt-get install unattended-upgrades
  • Edit the configuration: nano /etc/apt/apt.conf.d/50unattended-upgrades

    Unattended-Upgrade::Allowed-Origins {
            "${distro_id}:${distro_codename}-security";
    //      "${distro_id}:${distro_codename}-updates";
    //      "${distro_id}:${distro_codename}-proposed";
    //      "${distro_id}:${distro_codename}-backports";
    };
    
  • Enable the updates daily: nano /etc/apt/apt.conf.d/10periodic

    APT::Periodic::Update-Package-Lists "1";
    APT::Periodic::Download-Upgradeable-Packages "1";
    APT::Periodic::AutocleanInterval "7";
    APT::Periodic::Unattended-Upgrade "1";
    

Install Apache (or a complete LAMP stack using these instructions): sudo apt-get install apache2

Setup git:

  • Install git:
    sudo apt-get install git
  • Set user name2:
    git config --global user.name "Your Name"
  • Set user email:
    git config --global user.email "youremail@domain.com"

Flask App

File Structure for App

I’ll go into the details of the Flask app in a later post, but it’s important to understand the directory and file configuration before we get to deploying the app (as many of the commands are specific to this setup). I’ve taken a cue from these two Digital Ocean guides, and structured the app this way:

~/repoName
    |-- appName.conf        # Apache config file, to be copied after deployment
    |-- appName.wsgi        # The wsgi script Apache will call into
    |-- requirements.txt    # Virtual Environment configuration
    |__ /venv               # Virtual Environment (ignored by repo)
    |__ /appName            # Our Application Module
         |-- __init__.py    # The main logic
         |__ /templates
         |__ /static
         |__ ..
         |__ .
    |__ ..
    |__ .

Everything needed on the server is contained here; the steps below walk through cloning the repo, installing the necessary tools, and configuring the server to run the app.

Flask Deployment

At this point you have a basic webserver up and running; navigating to http://SERVER_IP_ADDRESS/ in your browser should take you to the Apache default page.

To deploy my Flask app, I’m using mod_wsgi. First, that needs to be installed:
sudo apt-get install libapache2-mod-wsgi

Install pip for managing Python packages:
sudo apt-get install python-pip

Install Virtualenv for managing the Python dependencies (as on the development machine):
sudo apt-get install python-virtualenv

Move to /var/www/ and clone the app git repo:

  • Move to the directory: cd /var/www/
  • Clone git repo: sudo git clone GIT_REPO_URL
  • For some reason, the repo comes down from BitBucket with lowercase name: sudo mv reponame/ repoName/

Setup the virtual environment:

  • Move to cloned repo: cd repoName
  • Create environment:sudo virtualenv --no-site-packages --distribute venv
  • Install modules: sudo venv/bin/pip install -r requirements.txt

Copy the site configuration for Apache, enable site, and restart Apache:

  • Copy the configuration: sudo cp appName.conf /etc/apache2/sites-available/
  • Enable the site: sudo a2ensite appName
  • Restart Apache: sudo service apache2 restart

HTTPS (added on 2016-03-05)

These instructions (as I discussed in this post) provide great guidance for configuring HTTPS with a certificate from Let’s Encrypt. First, install the Let’s Encrypt tool: sudo git clone https://github.com/letsencrypt/letsencrypt /opt/letsencrypt

Install a certificate: cd /opt/letsencrypt
./letsencrypt-auto --apache -d example.com

Install the le-renew script for auto-renewal:

sudo curl -L -o /usr/local/sbin/le-renew https://gist.githubusercontent.com/jeffvautin/5d98b4f7d42ab29463e2/raw/6a4b01a4caba2efd1e3dbc97a33d2ef1f80ecf26/le-renew.sh
sudo chmod +x /usr/local/sbin/le-renew

Edit the cron configuration: sudo crontab -e

And add this line, to run the renewal script weekly: 30 2 * * 1 /usr/local/sbin/le-renew example.com >> /var/log/le-renew.log

Other stuff

There’s still a bit to do, but I’ll circle back to these items after I go through the mechanics of the app in my next post:

In the future, I should script some of this3, but getting it written down is a good first step.


  1. I’m not worrying about this at the moment, but Digital Ocean provides instruction for configuring applications to use IPv6

  2. To see these settings on another machine, or to make sure you’ve set them correctly, you can use the command git config --list

  3. This article on Droplet Metadata may be helpful. 

Choosing a Language

In my last post I decided I’d try to write a small web app to serve as a relay for URLs called from my app, Snow Day. The first decision I needed to make was: what language should I use?

I wasn’t the only person thinking about this. I saw this conversation between Chris Adamson and Marco Arment:

Like Chris, I found the idea of pursuing Swift interesting, but thought it was a bit too premature at the moment. Python seemed interesting to me for a few reasons:

  • Many of my colleagues have begun to look at Python as an alternative to MATLAB for data set processing, and have been raving about tools such as Anaconda.
  • Blogs I read (like Dr. Drang’s site) often recommend Python for basic scripting tasks.
  • There are a few stable, well documented frameworks available for web services.
  • There are great tools for working with Python on iOS, like Pythonista.

Based on all of this, Python seemed like a reasonable choice for getting started.

Anaconda (or not)

I started by installing Anaconda 3.5, which was a mistake for at least one reason. The Python community is split into two camps: those still using Python 2.7, and those who are using Python 3. It looks like Python 2.7 is the right place to jump in, since both the Flask framework and Pythonista still require Python 2. My goal is to work with Python 2, while writing code that is forward compatible with Python 3.

The second reason installing Anaconda may have been a mistake is that it’s just more overhead than I need as I’m getting started. I was immediately trying to learn both a new language and a new tool.

So I uninstalled Anaconda, and fell back to using the Python version that shipped with OS X 10.11. I began working through the tutorials at Python Programming Language, to get a grasp of the language.

Flask

Based on this Stack Overflow comment, it seemed like Flask would be a good framework for trying to build my URL redirection service. I worked through the installation instructions on the Flask website. They recommend using Virtualenv to handle the Python configuration, and setup was easy on the Mac:

  • Install Virtualenv1: sudo easy_install virtualenv
  • Create a new environment: virtualenv venv
  • Activate the environment: . venv/bin/activate
  • Finally, install Flask in the new environment: pip install Flask

With Flask installed, I started working through the Quickstart guide.

Next Steps

In future posts I’ll detail the application I’ve built so far, and after that I’ll examine deploying it to an Ubuntu VPS.


  1. On an Ubuntu server, this step is: sudo apt-get install python-virtualenv 

Getting Up to Speed on Web Services

I was listening to the latest episode of Core Intuition, and around 42 minutes 30 seconds into the episode, I heard my name mentioned. It caught me off guard - when I replied to Manton on Twitter, I didn’t expect such a direct response on the program. Thank you, Manton and Daniel, for addressing my question:

My inquiry was in response to something Manton wrote:

I’ve always advocated for iOS developers to also be good at web services. Customers expect sync everywhere now, and you can do things with your own server that will give you an advantage over competitors who have a simpler, standalone iOS app. But being forced to migrate server data isn’t fun, especially on someone else’s schedule.

Web infrastructure largely remains a mystery to me. I’ve learned a bit about servers by migrating this site from Scriptogr.am to a self-hosted WordPress installation at Digital Ocean, but I don’t know any server-side scripting languages, and I’m intimidated by the prospect of server security. I want to learn more, but it’s tough to even sort out how to start:

  • How do I choose a language to tackle?
  • What’s the best way to manage servers, to be able to consistently spin them up quickly and securely?
  • How do you manage development versus production environments?
  • What about backups?
  • How do you monitor traffic and system status?

Daniel and Manton had a great high-level discussion about both using and building web services, with some solid advice. In particular, Daniel, around 54 minutes in, suggested taking on a small project as a first step. The example he gave was of a small trampoline-type URL redirection service he built to manage some of the web requests his apps generate.

This was an idea that had been kicking around in my mind for a while, too. Snow Day, my very simple weather app, makes direct requests of the Forecast.io API. This requires embedding my API token in the app, which puts me at risk of having someone extract it. I would greatly prefer having the app make a call to a server I run, which could then make the API request on the behalf of the app. This would allow me to keep the token private1, and it seems like a great starter project.

I think that’s what I’ll tackle. And I’ll try to document the process here as I move forward. So again, thank you, Manton and Daniel, for taking the time to respond to my question. I really appreciate the advice!


  1. …But requires me to figure out how to identify valid requests from the app…